If you're like us, you eat a lot of chicken. Although it's versatile and can be cooked and seasoned so many ways, sometimes it just gets a little... boring. Here's a recipe that can spice up your plate when chicken is what's for dinner.
Creole Chicken Cakes (adapted from Southern Living)
1 TBS olive or canola oil
1/2 medium sized red bell pepper, small dice
4 green onions, thinly sliced
1 garlic clove, pressed
3 cups chopped cooked chicken
1 cup soft breadcrumbs
1 large egg, lightly beaten
2 TBS mayonnaise
1 TBS spicy brown mustard
2 tsp Creole seasoning
1/4 cup canola oil
Heat 1 TBS oil in large nonstick skillet over medium heat. Add bell pepper, green onion and garlic. Saute until tender, 3-4 minutes.
Stir together bell pepper mixture, chicken and next 5 ingredients (through seasoning) in bowl. Shape into 3" patties.
Fry in 2 TBS hot oil in large skillet over medium heat, 3 minutes per side or until golden brown. Drain on paper towels. Repeat with remaining oil and patties. Serve immediately.
A lot of people equate Creole with tongue-burning spicy. But don't worry about these setting your mouth on fire, unless you use a very spicy Creole seasoning mix. (I like to make my own, mainly because I find the common grocery store brands to be incredibly salty. I'll share that recipe in a few days... I've got to get you to visit my blog again, right?) Creole Chicken Cakes are wonderful all by their lonesome, but we sometimes serve them with Ranch dressing or a dip made with yogurt, spicy brown mustard and just a drizzle of honey (made to taste, not measured).
Here's a little tip to make your finished product look like it came off the pages of Southern Living: Make sure the chicken pieces are small. Take the time to chop to a consistent size, around 1/2" pieces or just a bit smaller. This will result in cakes that hold together better, especially when transferring to/from the skillet and flipping. It also helps to chill them before cooking; in fact, you can make them up to 24 hours in advance and refrigerate until you're ready to cook. I've experimented with freezing the patties and seen mixed results. They must be completely thawed to cook evenly, but sometimes they weep and lose too much moisture while thawing, so I don't recommend it.
2.08.2012
1.30.2012
Chicken Nuggets You Can Proudly Serve
I'm always on the lookout for easy, healthy, fun food for my kids. When I stumbled across a recipe for chicken nuggets with veggies in them, I knew it would be a winner. I like to make this recipe, sometimes doubled, portion them into zip-top baggies, and stash in the freezer. I can nuke them for 45 seconds for a quick lunch or throw them in a lunchbox, and they're ready to eat at school lunchtime. And what kid do you know who has ever turned down a nugget, especially when they have dip?
Turkey and Veggie Nuggets (adapted from Cheeky Kitchen)
1 16 oz. package California Veggies (broccoli, cauliflower, carrots), thawed
1 egg
12 oz. ground turkey
1 tsp. onion powder
1 tsp garlic powder
1 tsp. paprika
1/4 tsp. ground mustard
1/2 tsp. salt
1/4 tsp. pepper
Panko for coating
Preheat oven to 400°. Spray cookie sheet with nonstick cooking spray.
Place the thawed vegetables and egg in a blender. Puree.
Pour puree into large bowl and add ground turkey and spices. Mix until well blended.
Spread Panko in thin layer on waxed paper, parchment paper or large cutting board. Spread turkey mixture over crumbs to 1/2" thickness. Top with Panko.
Cut nuggets in desired shapes using knife or small cookie cutters. Transfer to prepared cookie sheet and spray the tops of the nuggets with nonstick cooking spray. Bake for 14-16 minutes.
I usually use a 1 TBS scoop, slightly flatten the resulting ball, then coat in Panko, but I do sometimes use the cookie cutter method. If you want to cut cute little shapes, make sure your meat mixture is chilled; otherwise it will stick to the cutters. If you don't get the shapes into the oven quickly, stick them in the fridge for just a few minutes; this will help them keep that cute little shape you took the time to cut. Spraying the tops of the nuggets is optional, but it will make the Panko on top bake to a nice golden brown and get a bit crispy.
One thing I love about these nuggets is that I can easily get protein and veggies in Cooter's school lunch in one container and, hopefully, with less mess. He's 3 years old, and I hope it makes lunchtime easier for his teachers, Ms. Susan and Ms. Jaclyn, in a classroom of 16 preschoolers. K-Bob also loves them, so they're great for his meal if we go out for lunch or dinner since restaurant kid's meals usually aren't great for toddlers (although I think he would do his best to pick up a hamburger or other sandwich and take a bite).
***SOAPBOX WARNING***
I'm not a big fan of sneaking (not telling about or lying about the presence of) veggies into a child's diet unless that's the only way (meaning all other options have been seriously tried and failed) they're eating a healthy, balanced meal. Kids have to learn to eat well, and I don't think hiding fruits or veggies sets them up for success when they're making their own food choices. I've been blessed with 2 outstanding eaters and realize that I'm lucky, and many of you have probably struggled to get your kids to eat. However, I don't have a problem adding veggies or fruits to "healthify" a recipe, like substituting applesauce for oil in baked goods or adding extra veggies into tomato sauce. In fact, I do that all the time. It's good for all of us.
- Melissa
1.25.2012
Forget Buns of Steel. Gimme Honey Bun (Cake).
It's been years since I ate a honey bun out of a cellophane wrapper, but what a treat I thought they were back in the day. Some things are better remembered instead of revisited, so I think I'll leave those wrappers sealed. The fond memories of that unmistakable scent and flavor are probably what made this recipe so appealing. I've been making this cake for around 10 years; it has one of those classic flavors that appeals to most everyone, and it's easy as can be.
(This is normally where I'd show you what the cake looks like. You'll just have to click the link below to see how Betty Crocker's food stylists dressed it up. I'm good at cooking, not so much the photography.)
Honey Bun Cake (from Betty Crocker)
1 pkg butter recipe yellow cake mix
2 sticks butter or margarine, softened
4 eggs
8 oz sour cream
1/2 cup packed brown sugar
1/2 cup chopped pecans
2 tsp ground cinnamon
1 cup powdered sugar
1 TBS milk
1 tsp vanilla
Preheat oven to 350°. Generously grease bottom only of 9x13 pan. Reserve 1/2 cup dry cake mix.
Beat remaining cake mix, butter, eggs and sour cream in large bowl on medium speed for 2 minutes, scraping bowl occasionally.
Spread half of batter in pan. Stir together reserved cake mix, brown sugar, pecans, and cinnamon; sprinkle over batter in pan. Carefully spread remaining batter evenly over pecan mixture.
Bake 30-33 minutes or until deep golden brown and cake springs back when lightly touched in center.
Stir powdered sugar, milk and vanilla until thin enough to drizzle, stirring in additional milk, 1 tsp at a time, if necessary. Poke top of warm cake evenly with fork. Spread glaze over cake.
The last time I baked this cake I substituted plain yogurt for the sour cream, and it worked very well. It's a typical substitution, but I was concerned the yogurt may be too tangy.
Honey Bun cake is similar to a coffee cake, not too sweet with just a hint of cinnamon. It's a great cake for a brunch, in the afternoon with coffee or tea, or when you just need to feel like a kid again, without the cellophane.
1.23.2012
Under Pressure
I love my pressure cooker.
There, I said it. It feels good to get that off my chest.
Momma cooked with a pressure cooker often, but I never took to it. I think my hesitance to fully embrace it was partially because I had an old hand-me-down pressure cooker, and it was finicky. Then 2 years ago Momma bought me a new pressure cooker for Christmas. It's not a fancy one, and it's a bit small, but it gets the job done.
So, why do I love the pressure cooker? Let me count the ways...
1) It's fast. I can cook chicken breast pieces in less than 15 minutes, carrots in less than 10, brown rice in less than 20, dried beans in 30!
2) Dried beans (so much more economical than canned, not to mention the only sodium is what I add) cook to such a lovely texture. They still have to be soaked for 8 hours so they don't foam, but I can handle that.
3) Meats cooked in the pressure cooker are fall-apart tender, and shred very well if needed for a casserole or similar recipe.
4) One-pot meal. Enough said?
I could probably go on, but I think you get the idea.
Adam heard his mom tell one too many stories (or was it one story too many times?) of a pressure cooker "exploding," so he's a bit... cautious when it's on the stove. If you pay attention and follow the directions, the chances of this happening are basically zero, and today's pressure cookers are a bit more advanced than those generations before used.
I'm actually thinking of asking for a larger one with a pressure settings instead of just the regulator so I can do some canning. I've checked out an awesome electronic model, but I think I'd miss the rattle of the pressure regulator. There's a sense of satisfaction that comes when the rattle starts and you can start counting down the (few) minutes until dinner's on the table.
1.22.2012
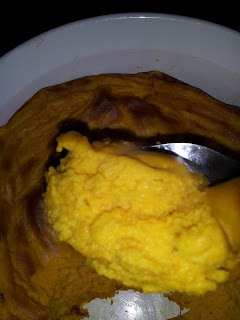
Fluffy Carrot Souffle
Carrots are a long-time favorite of mine, but my experience with them was basically limited to raw, boiled or cooked with pot roast. Not that any of those preparations are bad, but they are pretty boring.
This Carrot Souffle recipe piqued my interest, but it took some convincing to get Adam on board with the idea. We were both pleased with the result when we first tried it a couple of years ago. Cooter loves it, too. In fact, so does K-Bob. It's an easy way for a family of 4 to polish off a pound of carrots in one meal.
Souffle. It sounds so intimidating. We've all heard of a souffle "falling." As I can recall, I'd never had a souffle before trying my hand at this orange beauty. I don't even know if this one really is a classic souffle. I'm sure Julia Child would scoff at this little recipe and scold us for labeling it as such. But I'm ok with that.
Fluffy Carrot Souffle (adapted from Splenda)
1 pound baby carrots
2 cups water
1/2 tsp salt
1/4 cup butter
3 TBS all-purpose flour
1 tsp baking powder
1½ TBS sugar or no-calorie sugar substitute
3 large eggs
1 tsp vanilla extract
Preheat oven to 350°. Grease a 1-qt baking dish.
Combine carrots, water and salt in a medium saucepan. Bring to a boil. Reduce heat and cook, covered, 12-15 minutes or until carrots are tender. Drain
Place carrots and butter in a food processor. Process until smooth, scraping sides as necessary.
Combine flour, baking powder and sugar. Add to carrots and process until blended. Add eggs, one at a time, processing until blended between each addition. Add vanilla and pulse 2-3 times.
Spoon mixture into baking dish. Bake 30-45 minutes or until thoroughly heated. Serve immediately.
A note of caution: This mixture absolutely fills my 3-cup food processor. If you don't have a food processor that is large enough, you may be able to use a blender, but I've never tried it.
1.05.2012
Spiced Hot Chocolate
This Christmas I mixed up some spiced hot chocolate to give as part of our traditional goodie bags for teachers and friends. Apparently, the hot chocolate was a hit because I've had several requests for the recipe. But here's the thing, it was more of a "that looks good" mix than a "measure everything precisely" recipe. Here is my best attempt to give measurements, so your mileage may vary, and as always, you can mix it to your taste.
Spiced Hot Chocolate
6 servings of hot chocolate mix (either envelopes or scoops from a canister)
1/4 cup cocoa powder
2 TBS ground Saigon cinnamon
Mix hot chocolate mix, cocoa powder, and cinnamon.
To serve, add 1 oz of mix to 6-8 oz hot water. This recipe makes 7 servings.
For a single serving: 1 serving hot chocolate mix, 2 tsp cocoa powder, 1 tsp cinnamon. This will be a bit more sweet than the above mix because you'll be using a full ounce of the prepared mix instead of 1 ounce of the mix/cocoa/cinnamon.
Now, a note about cocoa powder. There are 2 types of cocoa powder, natural and Dutch processed or alkalized. In short, cocoa powder is naturally acidic, so it will have a leavening effect on baked goods, and it is quite bitter. Dutched cocoa powder has been treated with an alkali to neutralize the acid and is less bitter. You can read more at Joy of Baking. I've been using Saco Premium Cocoa Powder (unfortunately I have to order it online because it isn't available locally. Yes, it's much more expensive this way.), which is a blend of natural and Dutched cocoa powder, after reading about it online last year. I like this cocoa powder because I can typically use a bit less sugar than with natural cocoa powder alone since it isn't as bitter and still get a really deep, rich chocolate flavor.
Subscribe to:
Posts (Atom)