2.08.2012

Creole Chicken Cakes

If you're like us, you eat a lot of chicken. Although it's versatile and can be cooked and seasoned so many ways, sometimes it just gets a little... boring. Here's a recipe that can spice up your plate when chicken is what's for dinner.

Creole Chicken Cakes (adapted from Southern Living)


1 TBS olive or canola oil
1/2 medium sized red bell pepper, small dice
4 green onions, thinly sliced
1 garlic clove, pressed
3 cups chopped cooked chicken
1 cup soft breadcrumbs
1 large egg, lightly beaten
2 TBS mayonnaise
1 TBS spicy brown mustard
2 tsp Creole seasoning
1/4 cup canola oil

Heat 1 TBS oil in large nonstick skillet over medium heat. Add bell pepper, green onion and garlic. Saute until tender, 3-4 minutes.
Stir together bell pepper mixture, chicken and next 5 ingredients (through seasoning) in bowl. Shape into 3" patties.
Fry in 2 TBS hot oil in large skillet over medium heat, 3 minutes per side or until golden brown. Drain on paper towels. Repeat with remaining oil and patties. Serve immediately.

A lot of people equate Creole with tongue-burning spicy. But don't worry about these setting your mouth on fire, unless you use a very spicy Creole seasoning mix. (I like to make my own, mainly because I find the common grocery store brands to be incredibly salty. I'll share that recipe in a few days... I've got to get you to visit my blog again, right?) Creole Chicken Cakes are wonderful all by their lonesome, but we sometimes serve them with Ranch dressing or a dip made with yogurt, spicy brown mustard and just a drizzle of honey (made to taste, not measured).

Here's a little tip to make your finished product look like it came off the pages of Southern Living: Make sure the chicken pieces are small. Take the time to chop to a consistent size, around 1/2" pieces or just a bit smaller. This will result in cakes that hold together better, especially when transferring to/from the skillet and flipping. It also helps to chill them before cooking; in fact, you can make them up to 24 hours in advance and refrigerate until you're ready to cook. I've experimented with freezing the patties and seen mixed results. They must be completely thawed to cook evenly, but sometimes they weep and lose too much moisture while thawing, so I don't recommend it.

1.30.2012

Chicken Nuggets You Can Proudly Serve

I'm always on the lookout for easy, healthy, fun food for my kids. When I stumbled across a recipe for chicken nuggets with veggies in them, I knew it would be a winner. I like to make this recipe, sometimes doubled, portion them into zip-top baggies, and stash in the freezer. I can nuke them for 45 seconds for a quick lunch or throw them in a lunchbox, and they're ready to eat at school lunchtime. And what kid do you know who has ever turned down a nugget, especially when they have dip?


Turkey and Veggie Nuggets (adapted from Cheeky Kitchen)
1 16 oz. package California Veggies (broccoli, cauliflower, carrots), thawed
1 egg
12 oz. ground turkey
1 tsp. onion powder
1 tsp garlic powder
1 tsp. paprika
1/4 tsp. ground mustard
1/2 tsp. salt
1/4 tsp. pepper
Panko for coating

Preheat oven to 400°. Spray cookie sheet with nonstick cooking spray.
Place the thawed vegetables and egg in a blender. Puree.
Pour puree into large bowl and add ground turkey and spices. Mix until well blended.
Spread Panko in thin layer on waxed paper, parchment paper or large cutting board. Spread turkey mixture over crumbs to 1/2" thickness. Top with Panko.
Cut nuggets in desired shapes using knife or small cookie cutters. Transfer to prepared cookie sheet and spray the tops of the nuggets with nonstick cooking spray. Bake for 14-16 minutes.


I usually use a 1 TBS scoop, slightly flatten the resulting ball, then coat in Panko, but I do sometimes use the cookie cutter method. If you want to cut cute little shapes, make sure your meat mixture is chilled; otherwise it will stick to the cutters. If you don't get the shapes into the oven quickly, stick them in the fridge for just a few minutes; this will help them keep that cute little shape you took the time to cut. Spraying the tops of the nuggets is optional, but it will make the Panko on top bake to a nice golden brown and get a bit crispy.

One thing I love about these nuggets is that I can easily get protein and veggies in Cooter's school lunch in one container and, hopefully, with less mess. He's 3 years old, and I hope it makes lunchtime easier for his teachers, Ms. Susan and Ms. Jaclyn, in a classroom of 16 preschoolers. K-Bob also loves them, so they're great for his meal if we go out for lunch or dinner since restaurant kid's meals usually aren't great for toddlers (although I think he would do his best to pick up a hamburger or other sandwich and take a bite).


***SOAPBOX WARNING***
I'm not a big fan of sneaking (not telling about or lying about the presence of) veggies into a child's diet unless that's the only way (meaning all other options have been seriously tried and failed) they're eating a healthy, balanced meal. Kids have to learn to eat well, and I don't think hiding fruits or veggies sets them up for success when they're making their own food choices. I've been blessed with 2 outstanding eaters and realize that I'm lucky, and many of you have probably struggled to get your kids to eat. However, I don't have a problem adding veggies or fruits to "healthify" a recipe, like substituting applesauce for oil in baked goods or adding extra veggies into tomato sauce. In fact, I do that all the time. It's good for all of us.

- Melissa

1.25.2012

Forget Buns of Steel. Gimme Honey Bun (Cake).

It's been years since I ate a honey bun out of a cellophane wrapper, but what a treat I thought they were back in the day. Some things are better remembered instead of revisited, so I think I'll leave those wrappers sealed. The fond memories of that unmistakable scent and flavor are probably what made this recipe so appealing. I've been making this cake for around 10 years; it has one of those classic flavors that appeals to most everyone, and it's easy as can be.

(This is normally where I'd show you what the cake looks like. You'll just have to click the link below to see how Betty Crocker's food stylists dressed it up. I'm good at cooking, not so much the photography.)


Honey Bun Cake (from Betty Crocker)

1 pkg butter recipe yellow cake mix
2 sticks butter or margarine, softened
4 eggs
8 oz sour cream
1/2 cup packed brown sugar
1/2 cup chopped pecans
2 tsp ground cinnamon
1 cup powdered sugar
1 TBS milk
1 tsp vanilla

Preheat oven to 350°. Generously grease bottom only of 9x13 pan. Reserve 1/2 cup dry cake mix.
Beat remaining cake mix, butter, eggs and sour cream in large bowl on medium speed for 2 minutes, scraping bowl occasionally.
Spread half of batter in pan. Stir together reserved cake mix, brown sugar, pecans, and cinnamon; sprinkle over batter in pan. Carefully spread remaining batter evenly over pecan mixture.
Bake 30-33 minutes or until deep golden brown and cake springs back when lightly touched in center.
Stir powdered sugar, milk and vanilla until thin enough to drizzle, stirring in additional milk, 1 tsp at a time, if necessary. Poke top of warm cake evenly with fork. Spread glaze over cake.

The last time I baked this cake I substituted plain yogurt for the sour cream, and it worked very well. It's a typical substitution, but I was concerned the yogurt may be too tangy.

Honey Bun cake is similar to a coffee cake, not too sweet with just a hint of cinnamon. It's a great cake for a brunch, in the afternoon with coffee or tea, or when you just need to feel like a kid again, without the cellophane.

1.23.2012

Under Pressure

I love my pressure cooker.

There, I said it. It feels good to get that off my chest.

Momma cooked with a pressure cooker often, but I never took to it. I think my hesitance to fully embrace it was partially because I had an old hand-me-down pressure cooker, and it was finicky. Then 2 years ago Momma bought me a new pressure cooker for Christmas. It's not a fancy one, and it's a bit small, but it gets the job done.

So, why do I love the pressure cooker? Let me count the ways...

1) It's fast. I can cook chicken breast pieces in less than 15 minutes, carrots in less than 10, brown rice in less than 20, dried beans in 30!
2) Dried beans (so much more economical than canned, not to mention the only sodium is what I add) cook to such a lovely texture. They still have to be soaked for 8 hours so they don't foam, but I can handle that.
3) Meats cooked in the pressure cooker are fall-apart tender, and shred very well if needed for a casserole or similar recipe.
4) One-pot meal. Enough said?

I could probably go on, but I think you get the idea.

Adam heard his mom tell one too many stories (or was it one story too many times?) of a pressure cooker "exploding," so he's a bit... cautious when it's on the stove. If you pay attention and follow the directions, the chances of this happening are basically zero, and today's pressure cookers are a bit more advanced than those generations before used.

I'm actually thinking of asking for a larger one with a pressure settings instead of just the regulator so I can do some canning. I've checked out an awesome electronic model, but I think I'd miss the rattle of the pressure regulator. There's a sense of satisfaction that comes when the rattle starts and you can start counting down the (few) minutes until dinner's on the table.

1.22.2012

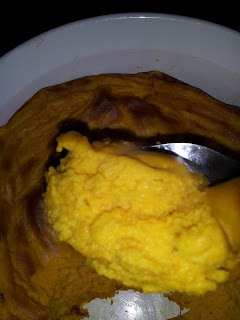
Fluffy Carrot Souffle


Carrots are a long-time favorite of mine, but my experience with them was basically limited to raw, boiled or cooked with pot roast. Not that any of those preparations are bad, but they are pretty boring.

This Carrot Souffle recipe piqued my interest, but it took some convincing to get Adam on board with the idea. We were both pleased with the result when we first tried it a couple of years ago. Cooter loves it, too. In fact, so does K-Bob. It's an easy way for a family of 4 to polish off a pound of carrots in one meal.


 Souffle. It sounds so intimidating. We've all heard of a souffle "falling." As I can recall, I'd never had a souffle before trying my hand at this orange beauty. I don't even know if this one really is a classic souffle. I'm sure Julia Child would scoff at this little recipe and scold us for labeling it as such. But I'm ok with that.

Fluffy Carrot Souffle (adapted from Splenda)
1 pound baby carrots
2 cups water
1/2 tsp salt
1/4 cup butter
3 TBS all-purpose flour
1 tsp baking powder
1½ TBS sugar or no-calorie sugar substitute
3 large eggs
1 tsp vanilla extract

Preheat oven to 350°. Grease a 1-qt baking dish.

Combine carrots, water and salt in a medium saucepan. Bring to a boil. Reduce heat and cook, covered, 12-15 minutes or until carrots are tender. Drain
Place carrots and butter in a food processor. Process until smooth, scraping sides as necessary.
Combine flour, baking powder and sugar. Add to carrots and process until blended. Add eggs, one at a time, processing until blended between each addition. Add vanilla and pulse 2-3 times.
Spoon mixture into baking dish. Bake 30-45 minutes or until thoroughly heated. Serve immediately.

A note of caution: This mixture absolutely fills my 3-cup food processor. If you don't have a food processor that is large enough, you may be able to use a blender, but I've never tried it.

1.05.2012

Spiced Hot Chocolate

This Christmas I mixed up some spiced hot chocolate to give as part of our traditional goodie bags for teachers and friends. Apparently, the hot chocolate was a hit because I've had several requests for the recipe. But here's the thing, it was more of a "that looks good" mix than a "measure everything precisely" recipe. Here is my best attempt to give measurements, so your mileage may vary, and as always, you can mix it to your taste.

Spiced Hot Chocolate
6 servings of hot chocolate mix (either envelopes or scoops from a canister)
1/4 cup cocoa powder
2 TBS ground Saigon cinnamon


Mix hot chocolate mix, cocoa powder, and cinnamon.
To serve, add 1 oz of mix to 6-8 oz hot water. This recipe makes 7 servings.

For a single serving: 1 serving hot chocolate mix, 2 tsp cocoa powder, 1 tsp cinnamon. This will be a bit more sweet than the above mix because you'll be using a full ounce of the prepared mix instead of 1 ounce of the mix/cocoa/cinnamon.


Now, a note about cocoa powder. There are 2 types of cocoa powder, natural and Dutch processed or alkalized. In short, cocoa powder is naturally acidic, so it will have a leavening effect on baked goods, and it is quite bitter. Dutched cocoa powder has been treated with an alkali to neutralize the acid and is less bitter. You can read more at Joy of Baking. I've been using Saco Premium Cocoa Powder (unfortunately I have to order it online because it isn't available locally. Yes, it's much more expensive this way.), which is a blend of natural and Dutched cocoa powder, after reading about it online last year. I like this cocoa powder because I can typically use a bit less sugar than with natural cocoa powder alone since it isn't as bitter and still get a really deep, rich chocolate flavor.

12.31.2011

Caramelized Onions and Roasted Garlic. A saucy match made in foodie heaven.

Back in November, I made a vegetable dish for a Christmas potluck. No, I'm not calendar challenged; it was the last meeting of a Bible study before the holidays. The veggies were broccoli and cauliflower, but that's not important. The key to making this side dish divine was the sauce I used. Thinking ahead about this blog, which didn't exist yet, I asked a friend to snap a pic with her iPhone.


Caramelized onion and roasted garlic sauce. I was inspired by a Rachel Ray recipe. I had the TV on for background noise while doing some chores at nap time and happened to catch a cooking segment on her show featuring a pasta recipe using these two ingredients. I had planned to make a cheese sauce for the broccoli and cauliflower, but I think God had other plans for them and sent the word through Rachel Ray! I'm so glad I happened to be listening that day (it's very rare for me to watch/read/listen to RR, just not my favorite TV/food personality) because this sauce is amazing. The sweetness of the caramelized onions and rich, buttery roasted garlic are a terrific pair, and the sauce is great for vegetables, pasta, and probably lots of other things I haven't even considered. I even had some of the leftover sauce on a baked potato; no butter, salt, pepper, sour cream or anything else.

Caramelized Onion and Roasted Garlic Sauce
1 bulb garlic
olive oil
2 sweet or yellow onions, thinly sliced
4 TBS butter
salt
pepper
chicken or veggie broth (water would work in a pinch)
milk, half and half or cream (optional)
grated Parmesan cheese (optional)

Roast garlic: Cut top off bulb and remove any loose papery skin. Drizzle cut side with olive oil, sprinkle with salt and pepper, wrap in foil and roast at 375º for 45-60 minutes.

Caramelize onions: Melt butter in heavy pan over medium heat. Add onion and toss to coat. Stir onions frequently until they are golden brown, about 30 minutes. If they brown too quickly or get dark on the edges, reduce heat. Add salt and pepper to taste. Deglaze pan with about 1/4 cup of broth.

Add garlic and onions to food processor with enough broth to make smooth.
Return to pan and add 1/2 cup of milk, half and half or cream to give the sauce some body. (This amount is really to taste and depends on what you are saucing and if you want to add dairy.) Bring to a low boil, reduce heat and stir until thickened. Add Parmesan if desired.


I can imagine this sauce would be really tasty with some sautéed mushrooms added at the end and served over rice, a healthier version of the cream of mushroom soup rice I grew up loving. I would also like to try it with ricotta added at the end instead of the milk/cream. It might be an interesting filling for a white lasagna...

12.23.2011

Cracker Thingies

Descriptive title, huh?


Well, it'll have to do because that's what we call one of the most addicting goodies we make at Christmas. Adam actually loves them so much that Momma makes some for him almost every time they come to visit. It's like their very own tradition. Isn't is sweet? (not just because of the sugar...)

These are oh-so-easy but a bit time consuming to assemble. However, they're lots of fun to make with the kiddos, who no doubt will enjoy the fruits of their labor, not to mention licking the peanut butter and chocolate off of their fingers.

Cracker Thingies
Ritz Crackers
peanut butter (smooth or chunky, your preference)
Chocolate Almond Bark coating (or chocolate chips and paraffin wax)

Spread peanut butter on half of the crackers. Top with remaining crackers.
Melt chocolate coating per directions on package.
Dip cracker sandwiches in coating so completely covered. Let excess drip off then place on waxed paper to cool and harden.


See all those delicious layers? I'm eating them right now. The one I cut for that picture simply couldn't be put back in the container.

Cracker Thingies keep very well as long as they're kept in an airtight container in a cool spot. The crackers stay crisp, and the peanut butter doesn't dry out. They even freeze well.

With only 3 ingredients that you probably have on hand, these treats are sure to be a hit for your holiday.

12.19.2011

Chai Spice Cookies

I love tea. I love cookies. What better way to enjoy them than to eat cookies with tea in them!


These Chai Spice cookies have become one of my favorite Christmas cookies. They have a gentle spiciness from Chai tea and pumpkin pie spice and a flavor that even the men in my family (who wouldn't go near a cup of Chai tea) love. I've been making these cookies for 3 or 4 years, and I've made some slight adjustments to suit our taste. This is a wonderful dough that freezes well if you want to have some dough on hand to make quick cookies when guests drop by.

The original recipe is for cut-out cookies, specifically girl cookie cutters (it sounds wrong to call it a gingerbread girl cutter when it's not for gingerbread). I hate using cookie cutters. I found better success using cookie cutters with these cookies than others (like sugar cookies, my nemesis), but it's probably because these are a shortbread cookie and the dough is a bit stiff. Despite the success with this dough, I still don't like the extra flour and the rolling pin. Besides, re-rolling the dough scraps makes for tough, dry or crumbly cookies, and i don't want any of this dough to go to waste. This year I made a batch of spiced sugar cookies (ho-hum - should have just made these) for a cookie swap and was reminded of my disdain for cut-out cookies; when it came time to make these beauties I treated them like slice-and-bake cookies and was thrilled with the ease and the results.

Chai Spice Cookies (adapted from Better Homes and Gardens December 2008)

2 Chai spice tea bags
3 cups all-purpose flour
2 tsp pumpkin pie spice
1/4 tsp ground nutmeg
1 1/2 cups butter, softened
1 cup sugar
2 egg yolks
2 TBS molasses*

Empty contents of tea bags into medium bowl. Add flour and spices. Mix and set aside.

Beat butter with electric mixer on medium-high speed for 30 seconds. Add sugar; beat until light and fluffy. Beat in egg yolks and molasses. Beat in as much of the flour mixture as you can then stir in the remainder (my Kitchenaid had no problem with all the flour).

Divide dough in half. If too sticky to work with, chill in refrigerator until it can be handled. Roll each half into a log (circle or square, triangle if you really want). Wrap logs in waxed paper (or cover halved dough if using cookie cutters.) and refrigerate 3 hours or until ready to bake.

Line cookie sheets with parchment paper or coat with non-stick cooking spray. Preheat oven to 350. Unwrap dough logs and slice 1/8" - 1/4" thick. (If making cut-out cookies, roll to 1/4" thickness and cut.)  Bake 12 minutes or until edges are lightly browned. Cool on cookie sheets 2 minutes. Transfer to wire rack to cool completely.

*I use sorghum syrup instead of molasses for several reasons, mainly because it's already in my pantry.


12.17.2011

Soft Sourdough

A friend shared her sourdough starter with me several months ago. I've used it to make English muffins, pancakes, waffles, biscuits and, of course, sourdough bread. I've also used it as a substitute for yeast in other bread recipes. I've been very pleased with the results, but the last batch of bread I baked knocked my socks off.

Some of the sourdough bread attempts have ended in a dry, crumbly bread with a dense crumb. I don't mind dense bread, but I like my bread to be soft and tender. I happened across this recipe from Home Joys after following a link from Pinterest for something else (who among you hasn't done that?).  I was intrigued that the recipe called for whole wheat flour in addition to all-purpose; that made me want to try it even more! The neighborhood cookie exchange party was a great excuse to make the bread, and I'm so glad I did. (Sorry there are no pictures, but you know what bread looks like, don't you?)


Soft Sourdough Bread (from Home Joys)

2 cups active starter
1 cup milk
1/2 cup water
1/4 cup oil or melted butter
1/4 cup honey
2 1/2 cup whole wheat flour *
3 cup white flour *
3 tsp salt


Mix all ingredients except salt for 2-3 minutes. Allow the dough to rest for about 20 minutes.

After rest, add salt and knead dough for about five minutes. If dough is too sticky, add slightly more flour but dough should be soft and not dry and stiff. Place in oiled bowl and allow dough to rise for 3-4 hours or until nearly doubled in size.

Divide dough into two pieces and shape into loaves and place in two greased bread pans. If a free form loaf is desired, place on greased baking sheet. Spray with oil and cover with plastic wrap to keep from drying out. Allow to rise for 2-3 hours.

When dough has risen, slash the top of the loaf. Bake at 400 degrees for 30-35 minutes. For even browning, turn loaves halfway through baking time

*Note that the amount of flour you'll need is dependent on how thick your starter is. Mine tends to be on the thin side, so I usually have to add flour.

I found the dough to be sticky even after adding more flour, but I was concerned about adding more and kneading any more than I already had, knowing that it could result in a tough loaf of bread. I also found that the dough didn't rise quite as much as I had hoped, but this is a common problem for me. (I need to do some studying up on bread baking, I suppose.) I also didn't slash the tops of the loaves before baking because I had 2 little ones hovering around me and the very hot oven. Despite all this, the bread was a success.

We've enjoyed it with just a bit of butter, toasted, and on sandwiches (it grills up so nicely on the panini press). There's still just a little bit left. But it won't last through the day tomorrow.


12.12.2011

I'm MELTING!!!!

My birthday falls shortly after Thanksgiving and just a few short weeks before the onslaught of Christmas merriment. While I L.O.V.E. cake, I have to step back and be practical about how much cake I should eat between slices of pumpkin pie and trays of Christmas cookies. I'm able to temper my cake needs with decadent molten cakes. These single serving beauties take only minutes to prepare. There are many variations; in the past we've had peanut butter, marshmallow, chocolate, and black forest, but the kind Adam made this year may be the best I've had to date.


Dark Chocolate Molten Cake
6 oz bittersweet chocolate+, chopped
10 TBS butter
1 1/2 cups + 1 TBS powdered sugar, divided
1/2 cup all-purpose flour
3 whole eggs
3 egg yolks

Heat oven to 325.
Spray 6* ramekins or custard cups with nonstick spray and place on baking sheet.
Microwave chocolate and butter in a large bowl at 50% power for 2 minutes or until butter melts. Stir with whisk until chocolate melts.
Add 1 1/2 cups sugar and all of flour. Mix well.
Add eggs and egg yolks. Beat until well mixed. Pour into prepared cups.
Bake 13-15 minutes, until cakes are firm at edges but center is still soft. Let sit 1 minute.
Place plate on top of cup, and while holding plate in place, flip cup over to unmold. Sprinkle with remaining 1 TBS powdered sugar.

+ If you don't have bittersweet chocolate you can substitute semisweet chocolate ounce-for-ounce or unsweetened chocolate (1 ounce unsweetened chocolate +1 TBS sugar) per ounce bittersweet chocolate.
* If you don't want to make 6 cakes, make as many a you want and refrigerate the remaining batter up to 2 days. Bring to room temperature before baking.

Ours ending up sitting for a bit more than 1 minute (I'm just amazed it wasn't 10 minutes with 2 little ones under foot.). They were very good, just not quite as gooey in the center. If you like a really melty center, make sure you unmold and eat quickly. If you prefer a more solid center, let them sit a few minutes. Either way, I bet you'll make these again.


12.05.2011

I'll never baste again.

The Thanksgiving turkey has come to our table roasted, smoked and deep-fried, basted, injected and rubbed. All are tasty, but I was not prepared for the just how tasty the turkey could be with a brine. I always suspected it would be too salty. I was wrong. Best of all, you can brine that turkey then cook it however you please.

I first brined the turkey in 2009 using Alton Brown's recipe. It was so tasty and moist, but there were some concerns that it was a bit too sweet, so I reduced the amount of sugar and increased the spices in the brine in 2010. I think we got the balance just right for us with that little change.

Now for a few caveats:
1) You must plan ahead for this one. Brining the bird takes at least 8 hours and the brine itself must be boiled then completely cooled before that. Plan on starting mid-day the day before you want to eat the turkey.

2) Brining might be messy. I'd advise you to do as much outside as possible so you don't end up with a brined kitchen floor.

3) You'll need a large container that can be sealed, think 5-gal bucket with lid or an ice chest lined with a large plastic bag (easier than disinfecting or pulling out a picnic smelling of the brine come July). I use a 13 gal garbage bag - no colors or scents please.

It sounds like a lot more work than roasting and basting. True, there are a few more steps and hours involved, but it's so worth it.

Nutty Barley Bake


Most of us have eaten barley before (Campbell's Beef Vegetable Soup with Barley, anyone?), but it's not a grain we serve very often. I've always enjoyed the nutty taste of barley, though my exposure was limited mostly to the instant kind from Mr. Quaker, usually in soups. I found this recipe in a Taste of Home cookbook and simply had to try it. We first had this savory dish when some friends came for supper in late summer 2009. With the first bite I knew it would be a keeper. I served this dish at Thanksgiving that same year, and it became a new family favorite.


Nutty Barley Bake (from Taste of Home)

1 medium onion, chopped
1 cup pearl barley
1/2 cup pine nuts
1/4 cup butter
1/2 cup minced parsley
1/4 cup sliced green onion
1/4 tsp salt
1/8 tsp pepper
2 14.5 oz cans beef broth, low sodium

Saute onion, barley and pine nuts  in butter until barley is lightly browned.
Stir in parsley, green onion, salt and pepper. Transfer to 2 quart baking dish sprayed with nonstick cooking spray. Bake at 350 for 1 hour 15 minutes or until the liquid is absorbed.


I haven't changed a thing from the original recipe. I can't think of a way to make it any better. I've toyed with the idea of using it as a base for a stew, but I've yet to act on it. I'll let you know what happens.

12.04.2011

Thanksgiving Traditions in the Making

As I mentioned in the previous post about Thanksgiving, the holiday has changed a lot since we've been married. Not only has the setting for the meal changed, but we've also added some new dishes to the menu. The only bad part about adding new things is that I'm not sure any of the old dishes were taken off the table. Oh, well. I'm always up for more great food!

Over the next few days I'll be posting our family's favorite new recipes to celebrate Thanksgiving.

12.03.2011

Cornbread Dressing

We don't stuff our bird. We dress it up with yummy cornbread dressing. I love dressing. Daddy loves dressing. Mom really likes it. My husband really doesn't like it. K-bob couldn't get enough of his first taste of dressing this year. However you make it - baked inside the bird or out - everyone has their opinion of the texture and the taste. Some like it wet, some like it dry, some like it crunchy on top. Some like it kind of bland, some like it with lots of sage. So this recipe doesn't have much in the way of measurements; those below are rough guidelines. It's different every year in an attempt to please all the palates at the table.


Cornbread Dressing
1 pan cornbread, crumbled (prepared the day before if possible)
1 cup chopped onion
1 cup chopped celery
1 egg, lightly beaten
1 1/2 tsp ground sage
1-2 tsp poultry seasoning
salt
pepper
broth

Sauté onion and celery until tender.
Mix onion, celery, cornbread, egg, and seasonings. Add broth so that mixture is thinner than cornbread batter.
Cook, uncovered, at 350º for 30-40 minutes, or until firm in the middle.

We usually boil the turkey neck to make some broth to use for the dressing. You can also pick off the neck meat (yes, you can eat the turkey neck) to add in. My mother-in-law used to cook a whole hen and put the meat in the dressing.

This is such a versatile recipe that it may take a few times to get it just right for your Thanksgiving table. I condone practicing several times a year in order to perfect you recipe. The leftovers work very well as a thickener for turkey or chicken soup if you aren't a fan of thin broth. I even like to eat it cold...